Study and Analysis of Geometric Effect of Ball Burnishing Process of Different Materials and Evaluation of Forces and Strain for Ballizing Process
Pawan K. Upadhyay1 * , A. R. Ansari2 and Pankaj Agarwal3
1
Department of Mechanichal Enggineering,
NIIST,
India
2
Department of Mechanichal Enggineering,
S.S.C.T,
India
3
Department of Mechanichal Enggineering,
India
DOI: http://dx.doi.org/10.12944/CWE.7.1.16
The process consists of forcing an oversized ball of a hard material through a pre-machines hole in softer material .The interference between the ball and the hole causes the hole to expand such that its deformation is partly plastic and partly elastic. The elastic deformation of the hole is recovered due to elastic spring back whereas the plastic deformation results in a slight permanent increase in the hole diameter after ballizing. Ball burnishing or Ballizing is a production process for improve the accuracy and surface finish of holes. This process is a mass production process for sizing and finishing holes. The sizing and finishing of holes depends upon the interference adopted for ballizing process. This paper is an attempt toward comparing surfaces effects ,Estimation of deflection, deformation, radial strain, stress and finished dimensions of Mild steel and Aluminium.
Copy the following to cite this article:
Upadhyay PK, Ansari AR, Agarwal P. Study and Analysis of Geometric Effect of Ball Burnishing Process of Different Materials and Evaluation of Forces and Strain for Ballizing Process. Curr World Environ 2012;7(1):101-108 DOI:http://dx.doi.org/10.12944/CWE.7.1.16
Copy the following to cite this URL:
Upadhyay PK, Ansari AR, Agarwal P. Study and Analysis of Geometric Effect of Ball Burnishing Process of Different Materials and Evaluation of Forces and Strain for Ballizing Process. Curr World Environ 2012;7(1):101-108. Available from: http://cwejournal.org?p=361/
Download article (pdf) Citation Manager Publish History
Select type of program for download
| Endnote EndNote format (Mac & Win) | |
| Reference Manager Ris format (Win only) | |
| Procite Ris format (Win only) | |
| Medlars Format | |
| RefWorks Format RefWorks format (Mac & Win) | |
| BibTex Format BibTex format (Mac & Win) |
Article Publishing History
| Received: | 2012-05-12 |
|---|---|
| Accepted: | 2012-06-20 |
Introduction
Geometrical Effects
When the ball passes through undersized hole, plastic deformation (ip) takes place, this plastic deformation of the hole may be due to many variables. It has been confirmed experimentally that interference (if) and plastic deformation (ip) have got a linear relationship i.e. they are proportional to each other.
If deviation is defined as the difference of ball diameter and hole diameter after ballizing the experiment also establishes that this deviation is also proportional to the amount of interference, velocity of movement of ball, and hardness of the base material. In the graphs all the dates are depicted which are gathered during experiments. In the experiments hardened steel balls were used for Aluminium and Mild steel bushes.
We get a finished desired diameter of hole, after the ball of definite diameter is passed from the initial diameter. These data of initial and final diameters of hole and diameters of ball are based on the data accumulated by trial and error experimentation as discussed earlier.
By dividing with D (the diameter of ball) we have made the values of interference and plastic deformation.Non-Dimensional these non-dimensional quantities are plotted which give a linear relationship as shown.
Construction of mathematical Models and equations
When the linear relationship is combined with the Hertz’s theory of contact stress of elastic bodies the equation is obtained in the form
Y=m. x + c
Let d1=initial diameter of hole
db = initial diameter of ball
and df = final diameter of hole after ballizing.
Then if = interference = db-di and permanent plastic deformation = ip = df-di.
During the process, the ball and hole both will under go elastic deformation, although ball is hardened and bush is made of a softer material.
There fore interference =
if = ip + eh + eb ...(1)
If we plot if against X axis and ip against y
asix we get.
ip=m.if + C ...(2)
Where
m = slope of the line and
C = a constant, which is an intercept on y axis.
For perfect elastic deformation ip = 0 and
for this
if = eb + eh
Also if = 0 eb = 0
ip = eh
From above we get
m = eh/eb +eh and C = -eh

Experimental
From experimental observations value of m and C can be obtained.
Referring to figs it is seen that the slope m of the linear relationship line is of the order of unity. However from the authors model it was proposed that.
This suggests that the value of eBis negligible. Thus it can be inferred that if the value of
eB = 0
Hence m =1
The author has observed in his study of ballizing experiments that during the travel of the ball, the bush indicates a marked bulge and the ball bas less likelihood of strain. It may be pointed out that for excessively thick walled bushes the value of eB cannot be adopted as zero.
A detailed theoretical model can be developed for estimating the values of strain eH. This model is based on the Classical contact stress analysis founded by H. Hertz and presented in next section. In Ballizing there is almost rectangular strip contact between ball and the hole. A comparison of experimental results with Authors model is indicated in fig.
Evaluation technique and methodology (For Strains)
Mathematical Model for strains in Ballizing
Referring the fig. is the length of contact and 2b is the breadth or width of contact. The interference between the ball and the hole wall gives rise to say pressure P per unit length.
The max. deflection is obviously occurring along xx.
We have to find an expression for this max. deflection.
It is true that the uniform pressure P along the line contact will give rise to semi elliptical pressure distribution as shown in the side view over the width of contact.
Adopting a simplified assumption that the pressure distribution is uniform of intensity q instead of semi elliptical (Based on Timoshenko and Goodier. Theory of Elasticity) a model is developed in this article.
Load Distributed over a part of the Boundary of a semi- infinite solid referring to diagram
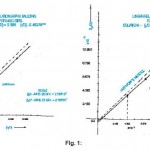 |
FIgure 1: Click here to View figure |
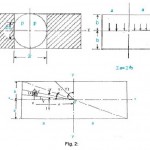 |
Figure 2: Click here to View figure |
Deflection at o due to load q.s. dψ. ds on the element is, processing on the lines
Estimation of deflection due to pressure
and the total deflection due to distributed pressure is.
(4 is used because there are 4 quadrants and the integral is only for the Ist quadrant)
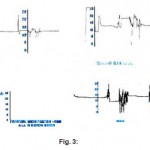 |
Figure 3: Click here to View figure |
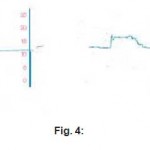 |
Figure 4: Click here to View figure |
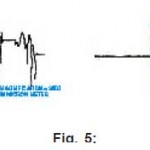 |
Figure 5: Click here to View figure |
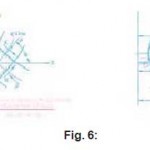 |
Figure 6: Click here to View figure |
since ƒ ds is the length of the chord for area
OAB, O ≤ ψ 1 ≤ tan-1 b/a
ƒ ds = 2d. Sec ψ1
Similarly for area OBC, ≤ ψ2 ≤ tan-1 a/b
ƒ ds = b. Sec. ψ2

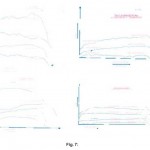 |
Figure 7: Click here to View figure |
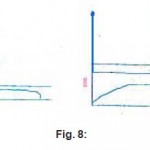 |
Figure 8: Click here to View figure |
(Formula for calculation of deflection) Substituting in the expression for w,

q = Pave
For calculating the radial strain in the wall of the hole
b = width of strip of contact and is
calculated by the equations
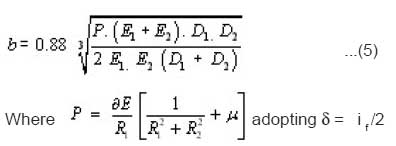
Thus the radial strain in the wall of the hole Ballizing.
Results and Discussion
a.Evaluation and analysis of different interference and with help of Fig.
Calculation for Radial Strain Aluminium Bushes
It is observed that with 150 and 50 microns interference respectively the final diameters obtained are 15.08 mm and 15.16 mm respectively. In the two bushes of 180 microns interference, from very rough surface as shown in fig. the final surface finish obtained was of 0.29 CLA, which indicates that a very good surface finish is obtained
In the two bushes, in which interference was kept only 50 microns, the surface finish was not so good as it gave the C.L.A. value as 0.65 .
Calculation for Radial Strain
For Mild steel Bush with 80 Microns interference
E = 1.96 x 10⁶ kg/sq mc p = 9903 kg/sq cm
2 a = π R1 = 5.677 cm. µ = 0.3 R1 = 0.9 cm
R2 = 1.8 cm and b = 0.0042 cm
The value of eH calculated from the
equation 3 which is

eH = 0.5 x 10⁻³ cm
Taking D = 1.8 cm
Making it non dimensional

For Aluminum Bush of 180 microns interference
E = 0.675 x 10⁶ kg/cm2
µ = 0.34
R1 = 0.9 cm R2 = 1.8 cm
2a = 2 p R1 = 5.677 cm. b= 0.0114 c, p = 3342.70 kg/ sqcm
The value of eH calculated from the equation
eH = 2.41 x 10⁻³ cm

The intercept on the Y axis is 1.35 microns according to authors model and aimed at adopting equal to 1.
A value of 50 microns has been adopted for strain calculations in the case of steel, whereas an interference of 150 microns is adopted for Aluminum because of sinking in tendency of Aluminum, under the load of an indenting ball.
Fig. indicate comparison between authors model and Experimental results.. Linear Relationship
(a) For M.S.
i p/D = 0.989 (if /D) - 0.49275 x 10⁻³
(b) For Aluminum :
ip /D=0.9644 (if /D) - 2.2 x 10⁻³ more,
with high interference.
Test result show that in the harder points in other
Discussion
On the result of investigation following Concluding remarks can be made
- From C.L.A. equation as well as C.L.A. plots it is clearly seen that improvement in surface finish is obtained material and more interference, axial load has increased. However, load is found to be independent of velocity.
- Temperature does not rise so much during ballizing that it may affect the surface finish.
- After, ballizing internal diameters of bushes were measured; which established the fact that ballizing is a microsizing process.
- There is very slight increase in diameter when interference is less. Keeping the same oversized ball.
- Theoretically as well as experimentally it is confirmed that if ballizing is done with more interference high velocity and on moderate BHN value, improved surface finish is obtained.
- Small circular contacts will be observed on the entire circumference as shown in Fig. 6.1.
- Co-relation factor for C.L.A. equation is 0.9583 whereas for load equation correlation factor is calculated to be 0.8677.
- Both the results show values are quite high and curve fitting is satisfactory in both the cases.
- Variation of load on the length of bush shown that, nearly at the center of the bush length the load is maximum.
- Vibration in he load curve may be due to variation in the geometry accuracy while boring.
- Objectives of the Proposed work Sizing of bushes and final results will be of utility to industries.This will help in achieving high precision by selecting appropriate “Ball-Tube” combination.
(a) determination of optimum interference for best surface finish.
(b) Proposing Mathematical models based on the theory of elasticity (Hertz contact stress equations) and theory of plasticity involving slip line field solutions.
(c) Strain models – Graph between ip and if.
(d) Axial force models (calculation of F for ballizing)
(e) A comparison of the Mathematical Models of the Ballizing process with experimental Investigations.
(f) Surface finish evaluations using qualitative and quantitative measures.- Interference (if) should never exceed 2x of the hole diameter.
- It has given very good results for bores ranging from 0.5 mm to 125 mm diameter.
- The length to diameter ratio has also been recommended length should not be more than 10 times or less than 1/10 of the bore diameter.
- Wall thickness should also be greater than 1/10th of bore diameter.
- Ballizing gave good results for hole diameters of 1.5 mm to 25 mm.
- Part to be ballized should not be harder than 45 Rc. The balls must be more hard than 65 Rc. (65 Rockwell C scale).
- Materials should be homogeneous.
- Wherever ballizing length is more, arrangement, for pressing or pulling the ball though the bore has to be devised.
- Porous, spongy or parts that wave hard spots due to casting, ballzing does not give uniform surface finish,
- Although some cast parts are successfully ballized.
- Every curved tubing cannot be ballized.
- Parts that have case hardened layer upto 0.4 mm, can be ballized, but beyond 0.4 mm case hardened depth, ballizing connot be carried out successfully.
- When heat treatment is done after ballizing, sizing and finishing of the ballized hole get disrupted.
- It has given a relationship of Ball over size and bore undersize to obtain the final diameter desired.
- It has established that in a particular soft material (Medium Carbon Steel)
- When ballizng is done with a hard material ball the required bore diameters can be obtained as mentioned in the diagram (Fig. )
-
Some of the application are listed below
- Honned and Lapped surfaces can be further smoothened.
- Sizing and finishing of cross hole recesses.
- Hallize can pre-stress the bores.
- Slight tapers can be removed.
- Holes of gears, arms, valves, plates, levers, and chain links can be ballized.
- Good results can be obtained by ballizing for the following materials.
- Stainless steels, even Nickle chromium Alloys
- Lead, Chromium, Copper and even some non-metals.
- Sintered iron, sintered brass i.e. powdered metals.
- Case hardened surfaces can also be ballized, but these should be free from hard chromium layer.
Calculations applies equally for the β line starting at any points in AB wide range of application and being used as a noble process (ballizing), it has some Observations, Concluding remarks can be made are listed below
References
- Gazen, G.A. : Sizing and Finishing Holes by Ballizing Tooling and production, (2003).
- Agrwal, A.S. : ‘Ballzing process for burnishing holes’ Dissertation for P.G. Diploma in Production Engineering (Royal College of Science and Technology Glasgow, U.K.). (1992)
- Fedrov, V.B. : Residual stresses and fatigue strength with centrifugal ball strain hardening. Trans. Of Ural polytechnical Institute, 112: (1991)
- Enlimash and orgstankinprom : Improving gear efficiency by Burning Machine and Tooling, 3: 54 (1999).
- Kononenko, V.T. and shamlin, V.Yu. : ‘Carbide burnishing unit for broaches’, Machine and Tooling, 8: 35 (2005).
- Ryzhov, E.V. ‘Increasing contact stiffness by vibratory burnishing’ machine and tooling., 1: 59 (2002)
- Vestnik Mashinostroeniya : ‘Self Centering Three Roller Attachment with Instrument to check Burnishing Forces’. Russian Engineering Journal, 57(7): 59-69 (2007).
- Vestnik Mashinostroeniya : ‘Calculating the Depth of plastic Deformation when Stengthening parts by Plastic surface Deformation’. Russian Engineering Journal, Vol.59(1): 19-23 (2009).
- Vestnik Mashinostroenita and M.M. zhasimov : The principal feature of Machining Methods Involving plastic surface Deformation , Russian Engineering Journal , 60(3): 33-34 (2000).
- Papcheff , D.D. : The formation of the micro-proflle on burnished workpiece’ , Microtechnic , XXI(2) (2002).
- Kudryavtsev , I. V. : Surface Plastic Deformation and its practical application’, Russian Engineering Journal 1: 25 (2002).
- Investigation of some effects of Ballizing on Aluminium and Mild Steel. First Indian Engg. 9-13 (1987).
- Investigation of Elastic and plastic forces in Ballizing process [Ball Burnishing] for Aluminium and Mild steel. First Indian Engg. 9-13 (1987).
- Investigation of surface Effects in Ballizing on Aluminum and Mild Steel. First Indian Engg. (1988).


